Materials:
Enough 3 hole spacer beads to circle your head
around 84 to 90 inches of 16 gauge craft wire
6 long head pins
6 pearls or round beads (if your beads have holes larger than the heads on the pins, you may need bead caps)
Tools:
wire cutters
small pliers
a small nail set
a hammer
a drill with a 1/16 bit (the littlest one you can get basically)
a pair of round bead pliers or bead reamer?
optional but very useful
Nylon head wire smoothing pliers
I am not a jeweler, nor do I pretend to be one. I am somewhat craftsy. These coronets are to be seen as cheap costume jewelry. I made mine because I haven't had the cash to buy a real piece of jewelry from an actual jeweler. These are for when you simply can't afford better.
To make these as inexpensively as I do--the whole coronet will be under $20 unless you really splurge on your pearls-- I order the beads on ebay. They will most likely come from China or Hong Kong. Remember we are making a piece of cheap costume jewelry here. If you want something real, save up and buy a good one from a real artisan. I absolutely will be doing so myself. These are ultimately a stop gap.
Anyway, go to ebay.com and search "Tibetan silver 3 hole spacer beads". Be aware and warned there is nothing silver about "tibetan silver". It's most likely an alloy of nickle, copper and zinc and may actually contain lead. More recent tests of random ebayed samples showed insignificant traces of lead, but it could be present. Here is Ebay's buyers guide on the topic.
You want ones that are straight sided rectangles so they make a solid band without gaps when wired together. To determine how many you need, measure your head then divide that by one bead's width. This will give you (approximately) the number of beads you need. You will likely not be able to order exactly the number you need, but a couple extras are good since you may find the odd deformed casting. More on how many beads you need, and my appallingly bad math will come later.

One of the first things you need to do after procuring your beads is to drill a hole in six of the metal spacers. This is in order to wire on your pearls/spheres. I could not get my dremel to drill these beads, they are pretty hard. My husband does them for me. He has a steadier hand and more skill with the heavier drill.
You need something to hold the beads in place while you drill them, a vice or clamp. If you use a metal clamp be sure to pad the bead with some scrap fabric (fiber? leather?) Anything to keep the vice from marring the metal bead. Drill a single hole in the middle of the narrow upper edge. You need to be super careful here because this is really the only critical part where you can ruin stuff if you blow the holes

It's balanced on the carnelian beads to get a good angle, so you can see exactly where the hole goes.
Now back to how many spacer beads go in your band. I said approximate above because my math is shakey. Let me explain. The coronet I am making with the skull beads is for a 23 inch head. According to Google's converter that is 584.2mm. Divided by the 12mm of one spacer bead's width, you get 48.683333333.
So it seems like I should be using 48 or 49 beads to get my 23 inch band (These coronets will usually be just a smidgen too big or too small do to the pre-made bead sizes). But not really, because no matter how tightly you snug them together, being lined up end to end there is tiny space between the beads. So when I laid out 48 of these end to end it ended up measuring almost 23 1/2. I thought I only need to use 47.
You can use the "circumference of your head divided by the spacer bead width" formula to estimate about how many beads to order, but before you wire anything together line the beads up end to end and measure them. You'll probably end up needing a beads less than you think.
Take the example in the following photo. Pictured are forty 11mm beads They are lined up snug, right against each other. They should theoretically measure 440mm/17.32in. Yet it's almost 19in. I don't totally understand how the miniscule gap between the beads pressing together ends up in the much extra length. I fully own that I am really bad at math.
If you know how to more precisely work out the number of necessary beads, awesome! Feel free to share it so I am no longer semi mystified. If you don't, use my imprecise math to estimate your bead order, but be sure to measure the total bead length before you do any wiring.

The following pictures show how I lay the beads out flat to get an idea how to order the sections before assembling the coronet. I leave them in these arrangements as I wire them so I don't have to keep recounting sections.
The pearls are only temporarily affixed to the holed beads as a visual aid in determining the layout. The first couple of these I made, I soldered the headpins holding the pearls in place before stringing the spacer beads together. This was a tactical error, as it made pulling the wire through the spacer beads painfully difficult. The bumps created by the headpins being welded to the back of the beads interfered with the wires passage. Also these are cheap pot metal beads, so the heat of my rinky dink Harbor Freight soldering iron discolored them. Now I only wire the pearls on, and I do so after I have assembled the band, as I will show you later. Back to the layout.
 |
| This is an example of an ideal, divisible by six, layout. Wired together in these grouping, the pearls will be perfectly even. We are rarely lucky for the needed number of beads to work out this way. |
 |
| When you have one less bead than an even X6, it doesn't matter much while you are wiring. But when you form the coronet into an oval to fit your head you just need to be sure the short section is in the front over your forehead. |
 |
| When you have one more than a perfect X6, compensate by placing the single larger segment at the back of your head. |
 |
| When you have two less than X6, orient the two shorted sections opposite each other on the sides of your head. |
 |
| Having two more than a X6 balances well with the extra beads placed to the side as well. |
 |
| If you have two less than X6, you can orient the short sections front and back. I think they look better on the sides, but this is an option. |
 |
| However two more than X6 done front and back won't look balanced unless you have a very wide brow. |
As shown in the layout pictures, you definitely affect the balance by how you orient the beads when you bend the finished band into an oval.
 |
| Two beads forward. |
 |
| One bead centered. |
.
The next thing I do is clean all the holes in all the metal beads to prepare them to be strung. I do this by cramming the end of a pair of rounded pliers in them and wiggling it around. I am sure this is tool abuse, and there is an actual implement for this, but I don't own it. Because these spacer beads are cheaply cast, skipping this seemingly tedious step will make yanking the wire through some 50 odd beads very odious. It will catch and stick. You can use thinner wire that fits easier, but then your band won't be as stiff. You can also only put two wires through the top and bottom holes of the band, but again it will be less solid.
 |
| Opening up the bead hole. |
Next step is to cut your three wires. I generally cut them around 28 inches long. It doesn't waste as much wire as you'd think. This is cheap craft wire and having the extra makes threading the beads and closing the band easier. I have a bag full of the end bits and use them for random little wire things.
 |
| If you are only doing one, the 7 foot coils of 16 gauge wire are just enough for three 28 in wires, or one coronet. I like the spools because I use a lot of wire and it's cheaper. |
This is where those optional nylon pliers are handy. If you never plan to make any other projects involving craft wire, I wouldn't invest in the tool. But it's brilliant for pulling that rolled up wire out nice and straight without kinking it.
You can now begin threading the spacer beads onto the wires. I use all three wires at once. The first few of these I did all the beads on one wire, then the second, then spent a lot of time swearing and fighting to coax the third wire through. Your mileage may vary.

Start by pulling the first few beads into in the middle. Then work out to either side. If you do it this way you never have to drag a bead along that whole 28 inches of wire. Stagger the wires a bit at their ends. Working all three wires at once is easier in the long run, but having space to guide each one individually helps too. You'll be evening them up when you're done.
I pull the first one to the center, but as I thread successive beads I will leave them staggered along the length as I go, until I need to snug them up for room to add more. This keeps the wire from kinking in my experience. Also pay careful attention you are not putting any beads in backwards or upside down. Which is tragic to discover when you are nearly done. Trust me.
 |
| First centered spacer bead. |
 |
| Staggered wires make threading all three wires at once simpler. The wires are not cut to different lengths. the "longer" one is simply pulled further through the central starter bead. On the other end it's the short wire. |
 |
| Just start with the longest wire and slide each successive one in. If a particular bead gets sticky, trying reaming it again. |
 |
| A rear view of what's going on. |
 |
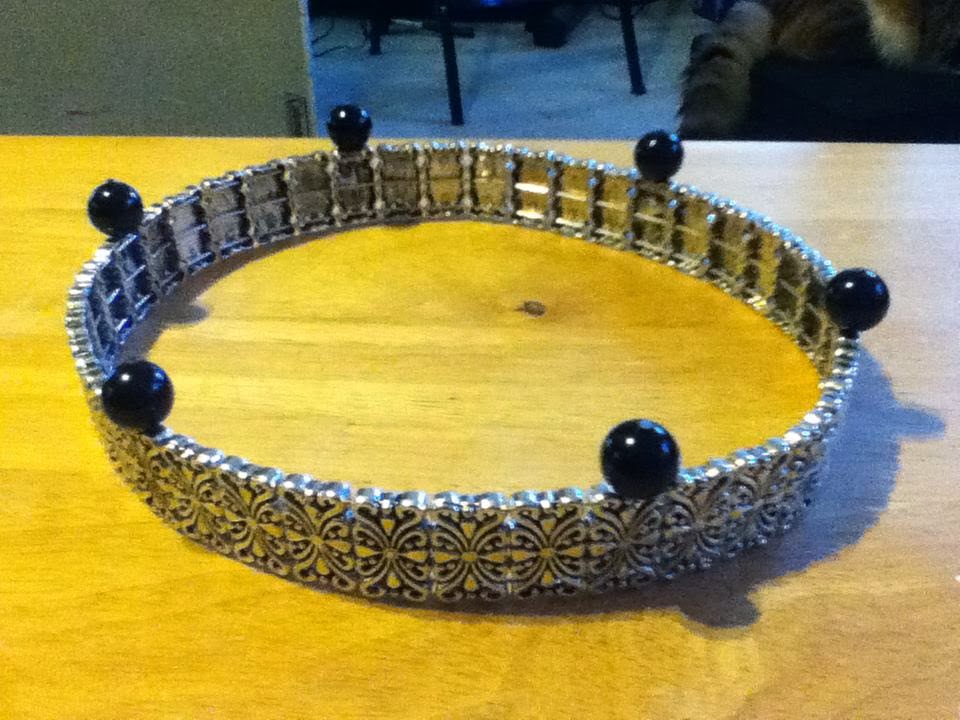
| When all your spacers beads are strung you will have a relatively stiff, flat band. Don't worry if it seems a little wobbly. when you form it into a circle you will be pulling it very tight and it will look much better. |
TBC